Use the thermal imaging camera to check and optimize your home insulation to reduce heating costs
Share
In this blog post, you will learn how the Bosch thermal imaging camera GTC 400 C Professional works and how you can use it specifically to check house insulation, the sealing and insulation of windows and doors and to identify hidden moisture damage.
What is a thermal imaging camera?
A thermal imaging camera is an electronic measuring device that detects invisible heat radiation and converts it into a visible image. Temperature differences on a surface are represented as differences in color or brightness. Areas that appear warmer are shown in shades of red or yellow, while cooler areas appear in shades of blue or green.
How does the Bosch GTC 400 C PROFESSIONAL work?
The Bosch GTC 400 C PROFESSIONAL is a high-precision thermal imaging camera. It uses an infrared sensor to record the thermal radiation emitted by objects. This sensor consists of a large number of tiny detectors that measure the intensity of the infrared radiation. The collected data is then processed by a processor and converted into a detailed thermal image.
The most important steps:
- Thermal radiation: Every object with a temperature above absolute zero emits thermal radiation. This radiation is invisible to the human eye, but the thermal imaging camera can detect it.
- Detection: The camera's infrared sensor captures this heat radiation and converts it into electrical signals.
- Image processing: The electrical signals are processed by a powerful processor. Each pixel in the image is assigned a specific temperature value.
- Image display: The temperature values are converted into a color scale that is visible on the camera display. This creates the characteristic thermal images in which temperature differences are clearly visible.
Advantages of the Bosch GTC 400 C PROFESSIONAL:
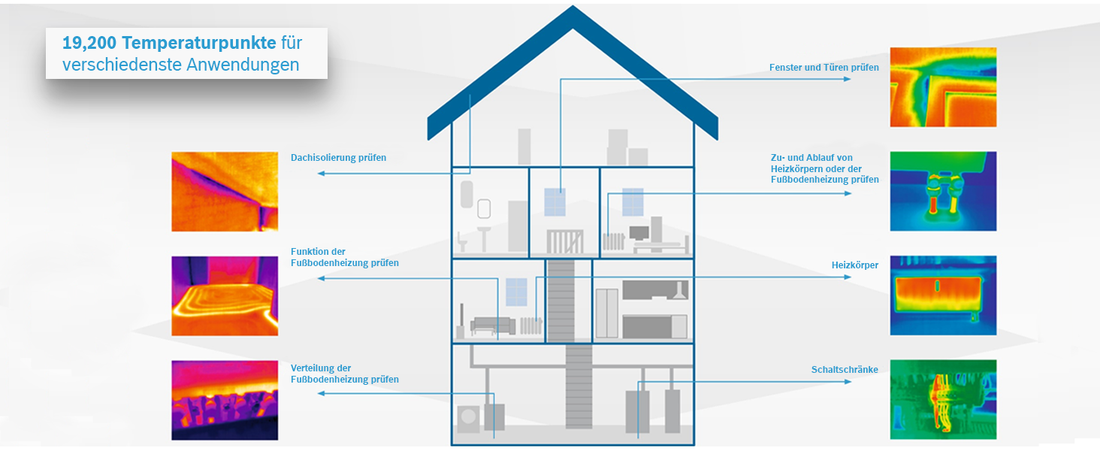
- High-resolution thermal images: Thanks to the 19,200 pixels, even the finest temperature differences are made visible.
- Intelligent picture-in-picture technology: An overlay of real and thermal images enables precise localization of thermal bridges and other problems.
- Versatile applications: The camera is suitable for a wide range of applications in trade and industry.
- Ease of use: The intuitive operation and the ability to save and transfer images make working with the camera easy and efficient.
Use of thermal imaging cameras to optimize house insulation
A thermal imaging camera such as the Bosch GTC 400 C PROFESSIONAL is a valuable tool for identifying weak points in house insulation.
Here's how:
- Preparation: Make sure that the indoor temperature is significantly different from the outdoor temperature (e.g. on a cold winter day).
- Taking thermal images: Systematically go over all exterior walls, windows and doors with the camera and create thermal images.
- Evaluation:
- Cold bridges: Look for cold spots in the pictures, such as corners, joints or around window frames. These are an indication of heat loss.
- Leaks: Leaks in the building envelope, e.g. through cracks or holes, also appear as colder areas.
- Moisture damage: Moisture in the wall can lead to local cooling and is also visible on the thermal images.
Advantages of the thermal imaging camera for house insulation:
- Precise localization of heat losses: weak points can be identified quickly and accurately.
- Visual representation: The thermal images make the heat losses visible.
- Cost savings: Targeted renovation measures at identified weak points can lower heating costs and reduce energy consumption.
- Improved living comfort: Optimized insulation leads to fewer drafts and a more uniform room temperature.
Additional tips:
- Calibration: Make sure the camera is calibrated regularly to obtain accurate readings.
- Environmental conditions: Pay attention to external influences such as wind or sunlight, as these can affect the results.
- Right time: Perform thermography on a cool, dry day when the temperature differences between inside and outside are greatest.
Here are the main applications of a thermal imaging camera:
1. Detecting thermal bridges:
- Definition: Thermal bridges, often colloquially called cold bridges, are places in the building envelope where heat is dissipated more quickly than in other areas.
- Detection: With the thermal imaging camera, these areas become visible as colder areas because more heat escapes to the outside through them.
- Significance: Thermal bridges are often the cause of high heating costs and can lead to mold growth.
2. Checking the insulation thickness and quality:
- Uneven insulation: The thermal imaging camera clearly shows whether the insulation is of different thickness or quality in different places.
- Missing or damaged insulation: Missing or damaged insulation leads to clearly visible temperature differences.
3. Checking joints and connections:
- Leaks: Joints, connections and penetrations are often weak points in the building envelope.
- Visualization: The thermal imaging camera makes leaks visible by displaying the heat radiation at these locations.
4. Checking windows and doors:
- Tightness: The camera shows whether windows and doors close tightly and do not allow heat to escape to the outside.
- Leaky frames: Leaky frames or fittings become clearly visible.
5. Look for hidden moisture damage:
- Moisture: Moisture in the building structure often leads to increased heat loss.
- Localization: The thermal imaging camera can help to localize the affected areas.
6. Assessment of remedial measures:
- Before and after comparison: By comparing thermal images before and after a renovation measure, the success of the measures can be evaluated.
Conclusion:
Renting a thermal imaging camera is a good way to quickly and effectively identify weak points in your home's insulation. This allows you to take targeted measures to improve energy efficiency and save on heating costs in the long term.